PUSSYBOW BLOUSE | VOGUE 8772

When I find patterns that fit my personal style, I will sew them over and over again. These blouse and pants patterns have become my go-to options for button down tops and wide leg trousers. They’re both classics and classy. Changing up the fabrics yields endless possibilities. You haven’t seen the last of these patterns as I continue to rebuild my wardrobe, so let’s take a look at the latest outfit. This blog post is sponsored by Baby Lock. All opinions are my own.

Pattern Information
I used VOGUE 8772 to make the pussybow blouse, View B. The blouse is fitted with collar, sleeve and hem variations, Fisheye darts and French darts. It is currently available on the Simplicity website in paper copy only in sizes 6 – 22. The company rates the pattern as EASY but I will say it depends on your skill level. If you’re a new beginner, I’m not sure this will be an easy project. Even if you’re an advanced beginner, I would only recommend this pattern if you’ve had some experience working with collars, sleeve cuffs, continuous lap on sleeves, and curved hemlines. For the pants I used VOGUE 9302. You can see details about the pants pattern HERE.


Although I didn’t follow the instructions from beginning to end, I did use some parts and they are well written and the illustrations are helpful. If you’re considering sewing the pattern as an Advanced Beginner, I recommend reading through the instructions before getting started to see what skills are necessary.


Fabric Information
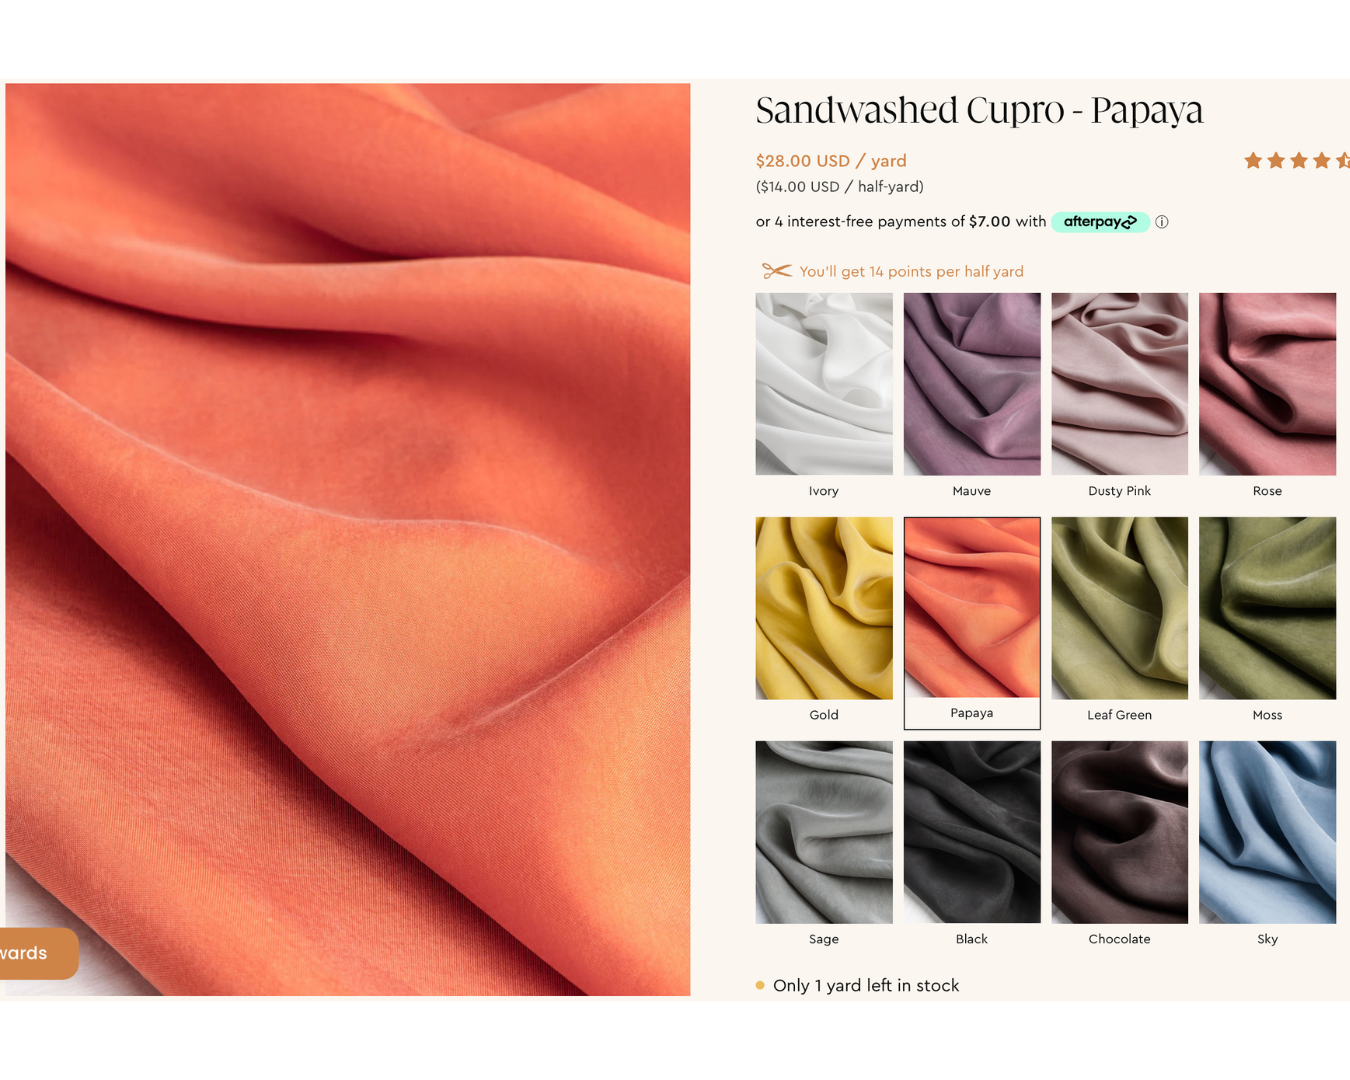
I used three different fabrics to make my outfit and they’re all from Core Fabrics. I used a delicious SANDWASHED CUPRO in the color Papaya, for the blouse. It’s available in lots of other beautiful colors (see below). The pants were made with a MIDWEIGHT EUROPEAN LINEN in the color Navy. It is also available in lots of other colors (see below). I lined the pants with my favorite lightweight lining, BEMBERG CUPRO LINING in the color Sand, which is also available in multiple colors (see below). This lining is so luxurious. You can receive 15% off your entire order from Core Fabrics when you use my code ANITA15 (excludes sale items). This is an affiliate link.


Inside the Garment
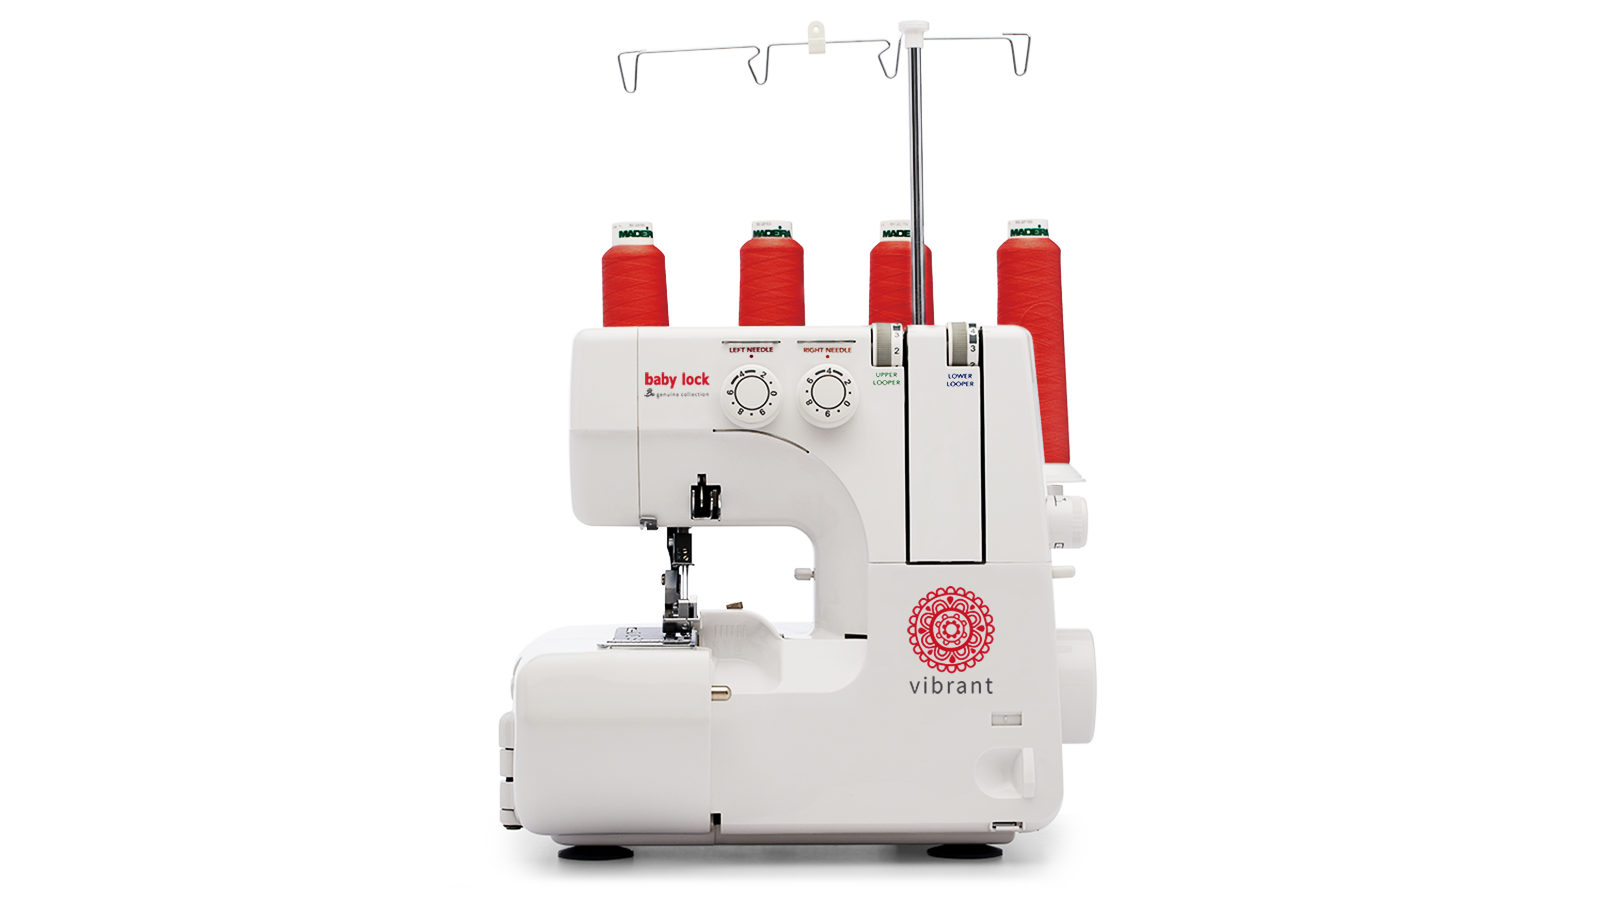
I used my BABY LOCK CHORUS sewing machine for all the seams, darts, and pleats. The seam allowances and raw edges for the hems were finished with my BABY LOCK VIBRANT SERGER.

If you are looking to upgrade your current sewing machine this year, you can get 10% off any Baby Lock Sewing Machine by using my code SAVE10-AAM4. Here is my AMBASSADOR PAGE where you can see some of the machines that I love, and accessories. (This is an affiliate link.)

When it comes to sewing buttons onto garments, I must admit it’s not one of my favorite tasks. I actually don’t enjoy any type of hand sewing. But there are times when it’s a must. However, the Baby Lock Chorus comes with a feature that makes sewing on flat buttons a breeze. There’s a button fitting foot (M) that is used in conjunction with the button sewing stitch.

Before placing the button onto the fabric, I apply fabric glue to the back. A FABRIC GLUE STICK works best for this task. It helps with placement because the button will move around as you’re trying to align the needle. While testing needle placement, you will have to raise and lower the presser foot to move the garment slightly. The glue keeps the button in place during this movement. I always test with the hand wheel to make sure the needle is clearing the button and entering the holes in the buttons.

The button fitting foot has a prong in the center that creates a thread shank so that the button isn’t sitting flat against the fabric after completion. And the button stitch is simply a zig zag stitch spaced perfectly for the holes in the button. Note: This feature only works with flat buttons with open holes, not shank buttons.

One thing I would do differently next time is use the same color thread as the fabric in the bobbin. In the photo below, you can see the thread knots. I used cream thread because I wanted it the same color as the buttons on the front side. The orange thread would actually look fine on top of the buttons. And because I sewed the buttons on twice for extra security, my knots are larger. You will see the last button in the photo below is smaller. That’s what it looks like sewing the button on once by machine. Quick tip: to secure the knots so that they don’t come loose, you can use a drop of FRAY CHECK.


In the next photo, I sewed a button on just once with orange thread in the bobbin. Although the cream thread does still come through a bit on the back, it looks much better than my original buttons. I will probably go back and re-do all the buttons because it’s not such a daunting task when sewn by machine. I will use orange thread on top and bottom next time.

With the automatic buttonhole foot and button fitting foot, adding buttons to my garments are no longer a dreaded task.

Here are some photos of the inside of the blouse.


Hemming Curves
If you are challenged with hemming curves, I want to share this awesome tool. I happened to run across it on Instagram. It’s called the JENERATES SILICONE HEMMER. It’s a flexible material that allows you to form it into any shape for hemming. Oh my GOODNESS! I quickly realized this would be a game changer when I used it on this curved hem blouse. Here’s how it works. (I am not affiliated with this company.)
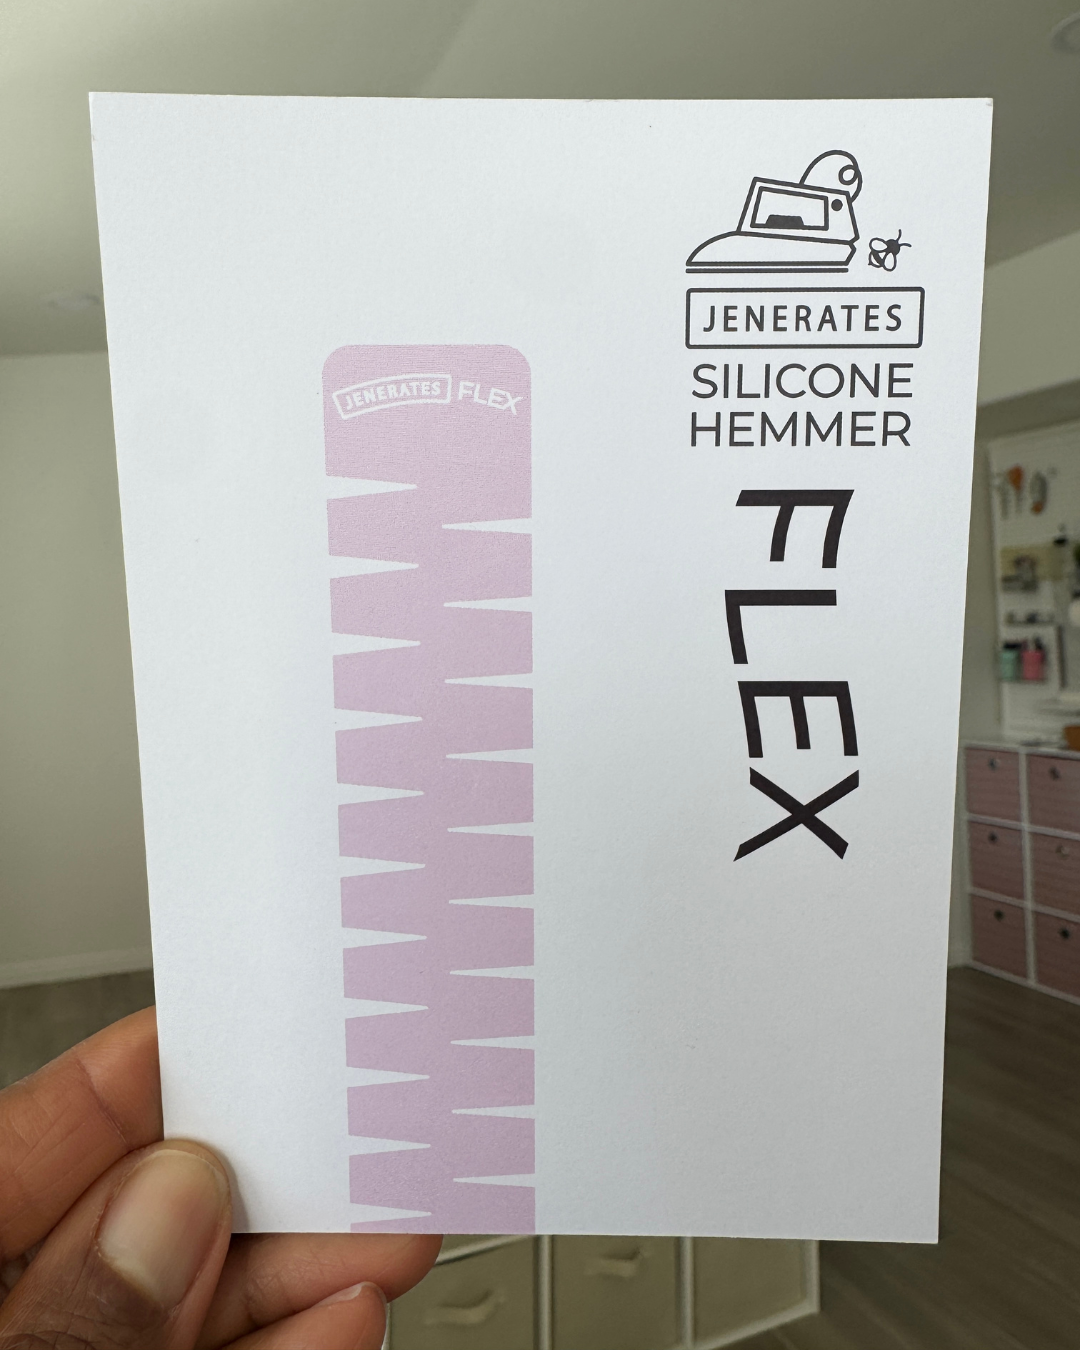
Place hemmer at edge of your garment and determine how deep you want the hem. The hemmer itself is 1″ wide. The holes on both sides are at different measurements. On one side the holes are 1/4″ and 5/8″, which is the side I’m using for a 5/8″ hem. The other side has holes for 3/8″ and 3/4″ hems.

After determining your hem depth, use a DISAPPEARING INK PEN to mark your fabric around the length of the hem.
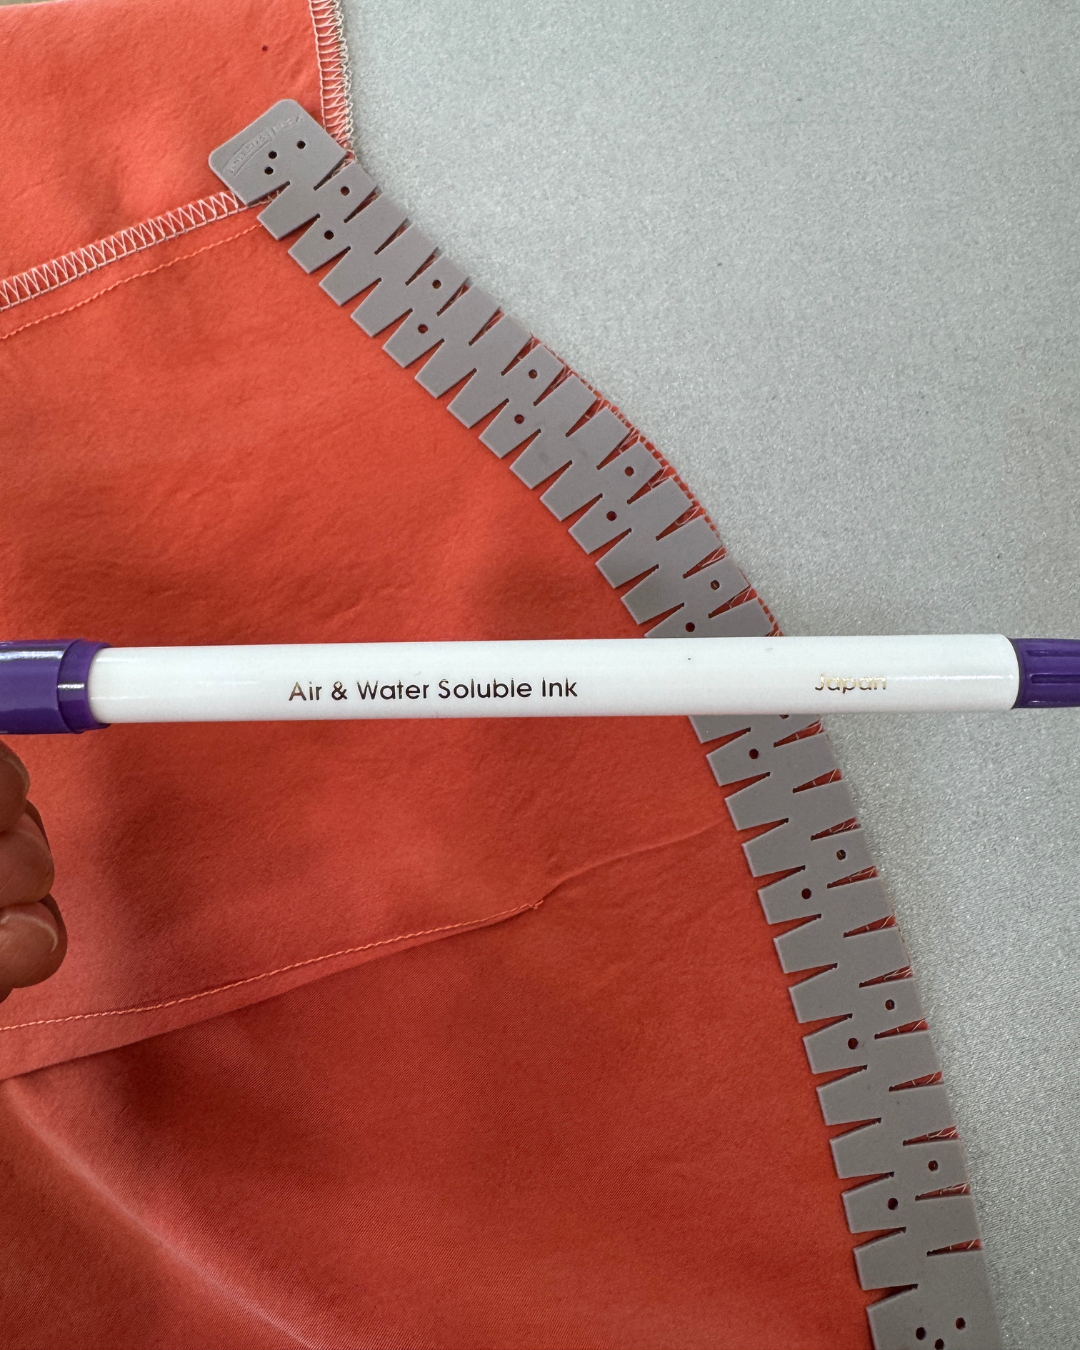


After you have marked the entire hem, move the hemmer up and align it with the dots. At this point, the instructions say to place pins into your ironing board (or felt mat) to keep hemmer in place. I skipped this step but it’s a good idea to follow that tip.

Next, press the hem over being sure to keep the hemmer in place evenly above the dots. Note: The hemmer gets really hot, so don’t touch it until it cools. Ask me how I know. Ouch!

Once you are done, you should have an even curved hem, in a short amount of time. I was surprised that there weren’t a lot of folds in the hem, which usually takes more effort to achieve. There was only one small fold in my hem and with a bit more time, I probably could have eliminated it. I am beyond excited to have this tool and can’t wait to try it out on different fabrics. Jen Hogg is the owner and she sells her products in her ETSY SHOP. She is based in the UK. (This is not an affiliate link.)


Notions Information
The blouse requires 1/2″ buttons. The amount depends on which view you are sewing. The pants require a 7″ zipper and one hook and eye closure. View B requires grosgrain ribbon for the side trim. I used a 12″ zipper and altered the length to accommodate the alteration I made to the waistband. Changes to the waistband are noted HERE.
Alterations Information
I cut a Size 8 on the blouse and this time it was too small because I forgot to widen the waist area like I did last time. Note to self for future: Go up to a Size 10. In order to fit the blouse, I had to eliminate a fold on the button placket (which served as the facing. That gave me enough extra room to button the blouse comfortably. To stabilize the placket for buttonholes, I simply applied interfacing to the facing side.


Styling Options
I had originally planned to style the blouse with a pair of cream wide leg pants that I made with Vogue 9302 but I didn’t like the fit on the finished garment. It’s such a shame too because they were beautifully constructed. I learned something helpful though. I’ve sewn these pants three times, with two different types of linen fabric. The first was a Linen/Rayon Blend from JoAnn’s, in white HERE. The pants were lightweight with a nice drape and the fit was decent. Next, I used this Midweight European Linen from Core Fabrics for the second pair, in navy. They are more structured and crisp. The Bemberg Cupro Lining added a nice drape to the pants. Then, for the last pair, I used the same Linen/Rayon Blend from JoAnn’s in the color Ivory. But this time I inserted the waistband differently for a cleaner finish, with no hand stitching. I don’t like them at all because the fit is off and I believe it’s because of the wider waistband in the lighter weight fabric.


So, here I am styling the blouse with my beautiful navy pants that I love so much. The fit is excellent and I’ve decided to sew more of these pants with the European Linen from Core Fabrics. Like I said in the opening to this post, when I find a good one, I’ll sew it over and over again.

I’ve accessorized the outfit with a pair of taupe, open toe pumps, and rhinestone stud earrings–keeping it simple. Of course, I had to style it with my new OVERSIZED PLAID COAT that I made recently. The pants and top are pulling out the orange and blue in the coat.


One thing I told myself when I decided to rebuild my wardrobe from scratch is that I want to LOVE every garment that goes into the closet. If I don’t LOVE it, I don’t want it. If I’m not cheesing and squealing and dancing in the mirror about my me-made garments, they can’t enter my closet. Period! The cream pants are in the donation bin. I would rather have less garments to wear than a closet full of pieces that don’t make me smile, pieces I don’t really like. I’m not about to pose in these photos, faking it for the post. I’ve done that before, then hung the garment back in my closet, like I’m gonna wear it again. Trying to keep it because “I made it.” Stop it! I’ll donate it so that someone else can love it. Keeping it real.

If you’re a beginner, let this be a lesson for you too. Sewing the same pattern in different fabrics doesn’t guarantee you will get the same fit. Fabric choice really does make a difference. Sometimes we learn through trial and error. And that’s okay. I’ve learned that this particular pattern looks best, FOR ME, in more structured fabrics. I’m looking forward to sewing a pair in wool soon. YES!

What do you think?
Do you like the blouse? I would love to hear your feedback. Scroll to the very bottom of this page to leave a comment.
Thank you for stopping by today! 💕

Other Related Links
- Sewing Project Checklist
- Learn to SEW Course
- Baby Lock Soprano
- Baby Lock Vibrant
- Baby Lock Euphoria
- Baby Lock Chorus
(DISCLAIMER: This blog post may contain affiliate links, which means that if you click on one of the product links, I’ll receive a small commission on qualifying purchases. All opinions in this post are my own.).)
Don't Forget your Sewing Project Checklist
I created a Sewing Project Checklist to help you stay organized while sewing your garments. If you missed the video where I shared 3 Steps to Time Saving Sewing for Beginners, check it out to learn how you can streamline your sewing process. Tap the button below to get a Free PDF copy of the Checklist.

Join My Community
Join others in my community for early access to new courses, exclusive member benefits, giveaways and updates when new content and products become available.

You Should Share This Blog Post With Your Friends
- Pinterest
- Facebook
- Twitter


BABY LOCK SEWING MACHINES


This Post Has 23 Comments
Thanks for sharing the bits that went wrong. It’s very reassuring. It’s also important for sewists to be discerning and recognise when something just doesn’t look or fit right. Both garments look magnificent. Thanks for sharing.
Anita Your blouse is beautiful I agree there is so much we can do with separates. I am hoping you would do a tutorial of any blouse. I know you love your beginners. Keep up the good work God Bless you Anita. X
You have inspired me once again. I have a similar store-bought orange blouse and a new pair of navy pants. You’ve inspired me to pair these two items together and right from my closet. Thanks, you look wonderful in this outfit.
I love it! You are so talented. You have the perfect body to model the clothes you sew.
Anita, I love this color combo! I have been looking for a blouse pattern, so I will give this one a try. Thank you for sharing.
I love the color of this blouse! I love the look of the fabric too. I have sewn view E of this pattern and with the different darts, it’s a perfect fit! It’s one of my favorite summer blouses.
Hello,
Anita, the blouse is beautiful. I love Closet Core fabrics, too! Thanks for including information on the hemmer tool. You are forever increasing my sewing knowledge. I have the blouse pattern in my collection. I am going to try to make one in a pink, as that is the new 2025 color. The linen pants flow so nicely!
Again, thank you for your attention to detail and wonderful teaching and sharing. You would make a wonderful educator at a school, too!
Excellent work!
Hi Anita,
As soon as I saw the fabric for the blouse, I knew it was some kind of sandwashed fabric……love it. Thank you for all the details too and I love that you are being deliberate about your sewing.
Great job sis!
Thanks Ms. Anita. The whole outfits (coat, blouse and pants) are stunning!
Thank you for information on the fabrics, notions, alterations and sewing project checklist.
I love your attention to details. I too like more structured fabrics and a tailored look as well; they always seem more classier to me.
Definitely will look into the European Linen from Core Fabrics. Keep on dancing and finding joy!!!
Blessings always.
Love the blouse! It looks really good. I have the pattern and now you’ve given me inspiration to make it. Thanks for sharing all of the details.
Excellent job!
Absolutely beautiful!!
Hi Anita,
Thank you so much for this wonderful blog post, which I enjoyed for so many reasons. I am a beginner (bordering on advanced beginner) and this was the first blouse I made, on the basis that it was rated as easy. Everything went well until I got to the cuffs and continuous laps, which I found so difficult. I had to give myself a stern talking to and persevered; I finished the blouse and love it. I will definitely make it again, now armed with the experience and I agree entirely that some experience with cuffs and laps would be highly beneficial to sew this pattern.
Your blouse looks so beautiful and how fabulous does it look with your new coat, which contains the same colours as your outfit!? Thank you for highlighting the Jenerates curved hemline guide and showing it in action – I will certainly be looking into that.
I have been guilty in the past of holding onto shop bought items in my wardrobe which no longer fit. It now gives me such a thrill to make garments that I can enjoy wearing that I often hang them up on the outside of the wardrobe door for a little while just to admire them! I will adopt your rule of having to love something before it earns a place in the wardrobe!
Thank you, Anita.
Kind regards,
Jill x
Anita, this is so YOU! The color combo, fit, and coordination looks so stylish. Please, please, please make a pair of pants in cream to wear with this blouse. Without a doubt, it will be another winning combination. With the coat, it looks like a 3-piece ensemble. Your “new closet” will be the envy of the sewing world; you are definitely adding stylish garments. While looking through my stash, I found that I have the blouse pattern so I’ll add it to my “To Do” list. Thanks so much for sharing. This is another great look!!!
Yes, De, this is ME!!! I MUST make a pair of cream pants to wear with the blouse. Plus, cream pants are a must in the new wardrobe.
Beautiful! I love the pussybow pattern, and the way you styled it. Thank you!
Thank you Cynthia.
Gorgeous! And I thoroughly enjoyed reading your entire post.
Also I agree that gone are the days for settling. If we’re not in love with it, let it go for someone else to love it!
Keep Shining with Brilliance, Anita!
Mel, thank you so much for reading my blog post. It really does mean a lot to me when people read because I put my heart into writing and sharing. I enjoy it a lot. Thank you. 💕
Beautiful. You always explain it In a way that I can understand and makes me look forward to everything you say. Thank you you are so inspiring.
This really blesses my heart, Janet. Thank you so much for sharing how my posts make you feel.
Wow, the amount of care and attention you put into sewing garments is so inspiring! This top is stunning and I love the color you chose. I also like the sentiment about keeping garments that bring you delight!
Thank you so much, Bridgid.